Menlo is a framework for rapidly developing decentralized applications (dApps). This framework is designed to provide users with a user experience on-par with the centralized apps they’re used to. While Menlo is different in many ways from “traditional” web app and even dApps, if you’re familiar with the Single Page Applications style of webapp architecture, Menlo should be relatively easy to understand. It can be used to build a variety of dApps such as a censorship resistant social media site, a blog, a crypto enabled eCommerce site, or a even a crypto exchange.
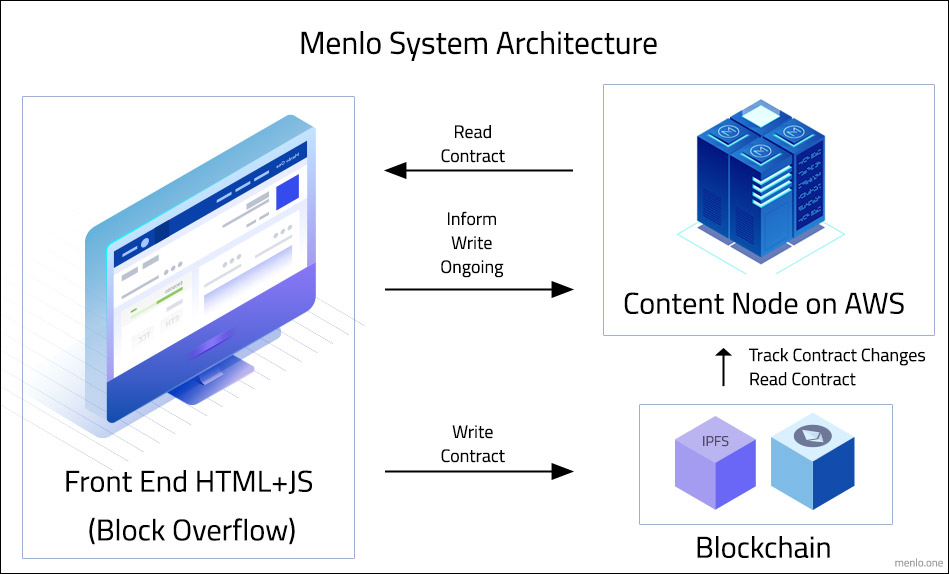
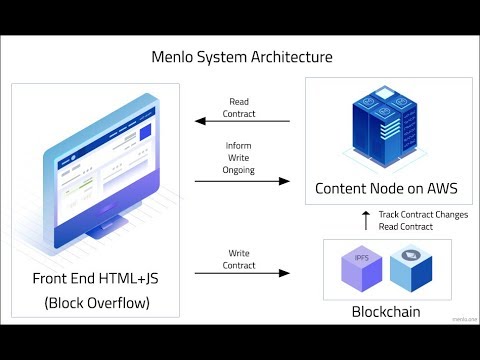
It consists of two major components:
A “Content Node”, which is a “back end” NodeJS / Express application which sits on a web server. It’s essentially a server side caching system for blockchain data. It has RESTful routes designed to be consumed by the front end. It processes data coming in and performs CRUD operations. It’s not possible to actually Delete or Update data, but we’ll get to that later. Data is not only stored on the Content Node, but also stored on IPFS and Ethereum, making Menlo apps decentralized and censorship resistant. This is quite different from how most dApps are built; our system caches data on a web server for speed so users who may not have any crypto can at still read the dApp, as well as for search engines to easily index content.
https://github.com/MenloOne/content-node
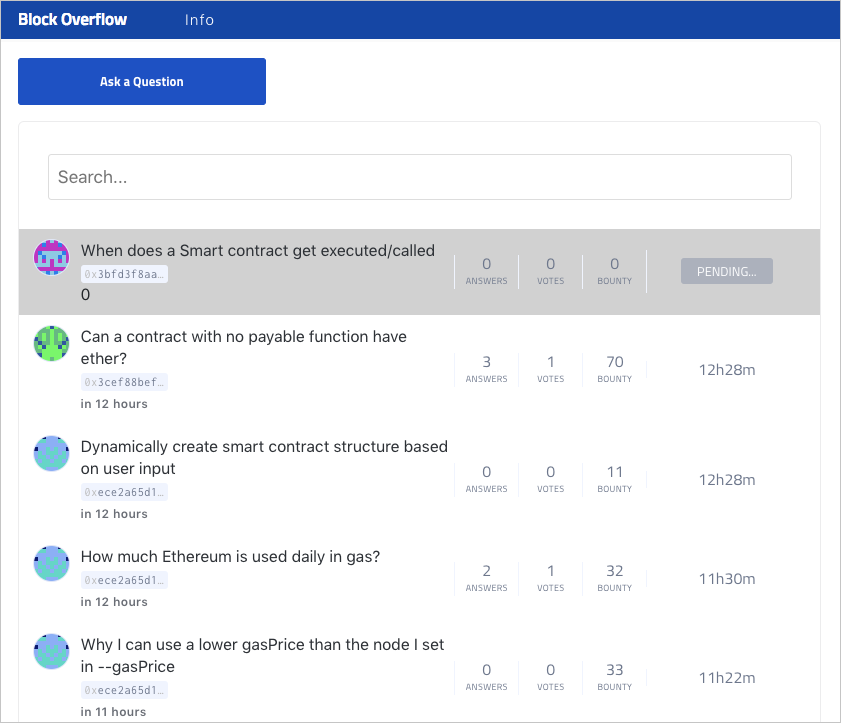
A “front end” single page application built in ReactJS. This is similar in many ways to a “traditional” dApp. It makes asynchronous calls to the Content Node as well as interfaces with a Web3 provider (we recommend MetaMask) for transactions. We built a demo application (Block Overflow), a nod to our favorite developer Q&A site, which has a wide variety of features common to many dApp use cases. It has many routes in place for actions such as posting content, upvoting, commenting, etc. The front end comes with Truffle and smart contract specific to the Q&A site use case but is easily customizable. It also comes with many common front end nice-to-haves such as Sass, Material UI, and many interface elements like drop down menus and loading animation.
https://github.com/MenloOne/block-overflow
This version of Menlo is an alpha release, but we hope it will give you everything you need to build a fast, user friendly dApp at hackathon-like speed.
-
Authentication: The users' Ethereum address is used to authenticate. This is a good way to authenticate a user without relying on centralized methods such as email or oAuth.
-
Real Time Updates: When a user posts content, other users see it near instantly - even before it’s confirmed on Ethereum. On most dApps, users often have to wait for a block to confirm before anyone can see the content. This could take a few minutes and creates a bad user experience. Content Nodes keep a web socket open with all dApps it’s connected to for real time updates. Posts which are submitted to Ethereum but not yet confirmed have a grey color to indicate they’re still pending.
-
Ethereum and IPFS: (used in conjunction) The Content Node understands Solidity stored hashes and can query the local IPFS instance in order to cache and return the hash and contents of IPFS in one contract state query.
-
IPFS Pinning: One of the attributes of storing data on IPFS is that any data which is not requested at least once within a 24 hour period is removed. To ensure data is not lost, the Content Node uses the local IPFS service’s “pinning” feature to prevent data loss.
Caution: If for some reason you shut down your Content Node you will lose your data unless someone else is requesting it.
Note: Block Overflow and Content Nodes currently store and request IFPS data in parallel from the CN IPFS service as well as Infura IPFS to provide a natural backup.
We built Block Overflow as the demo app for two reasons.
- This use case leverages several features which are common to many dApps such as offering bounties, conditional smart contract based token distribution, voting, and storing messages. This way you have a few examples to work from and adopt for your own dApp.
- We thought it would be useful if there was a Q&A site where you can post a bounty if you need a question answered quickly.
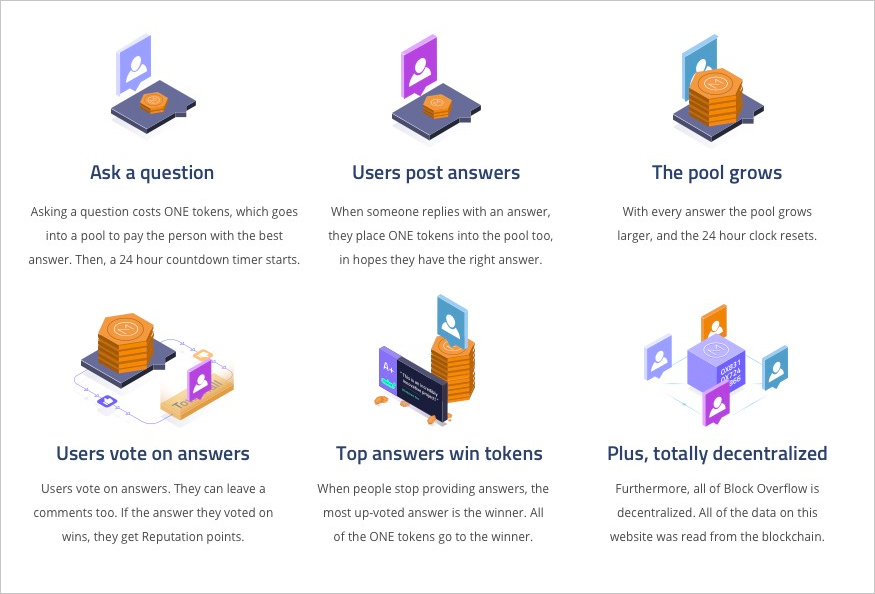
- A user presses the “Ask a question” button which scrolls them down the page to a form. The text box is a SimpleMDE WYSIWYG Markdown editor. This application requires users to offer a minimum bounty of 10 ONE Tokens to ask a question, but the user can add more if they wish.
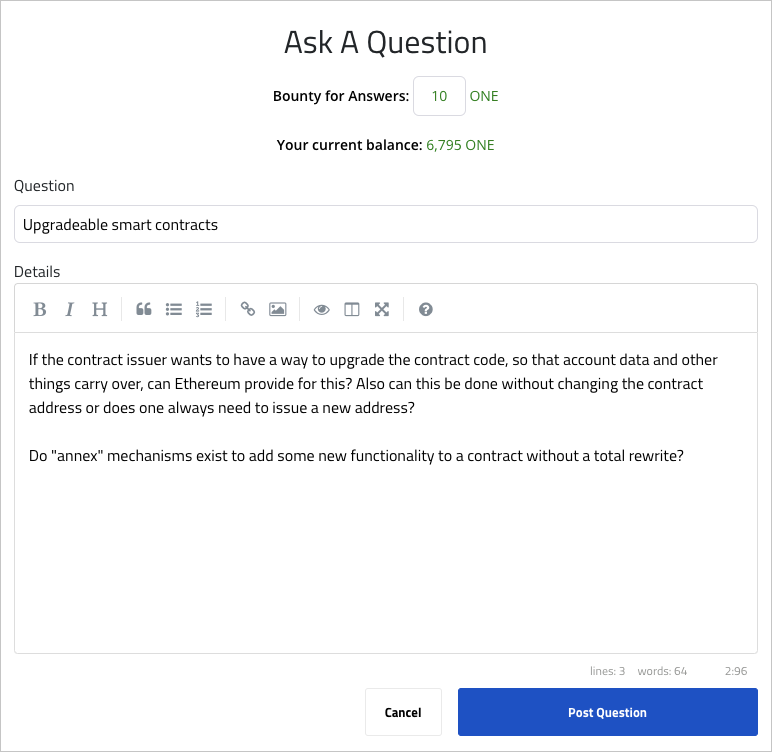
- When the user presses “Post Question”, the question is uploaded to IPFS and its IPFS hash is then tracked as part of the creation of a new
Topicwhich in turn creates aForumcontract which will hold the answers posted. Although this happens as part of theMenloTopicscontract, it is called via a call to theMenloToken transferAndCallTxmethod which allows a call to theMenloTopicscontract and a payment of ONE tokens as the initial bounty. MetaMask prompts the user to approve the transaction.
Heads Up: Sometimes MetaMask pops an overlay to approve, sometimes it does not, and you have to click on the fox icon in the top of the window. It’s a little inconsistent. The fox will have a number on him as pictured below.

-
The front end app then calls the Content Node to tell it there is an ongoing topic creation transaction. The Content Node pulls the question from IPFS on caches the uncommitted transaction. Any time a new topic is posted, the Content Node sends a signal through websockets to connected clients that there is a new topic and for all clients to refresh. Even though the transaction is not yet confirmed on Ethereum, other users can see the new message. If the transaction is not confirmed within 6 hours, the Content Node purges the message. If the Content Node sees the posted transaction confirm, it pulls the official version of the question from Ethereum and notifies clients to refresh given the topic is now confirmed.
-
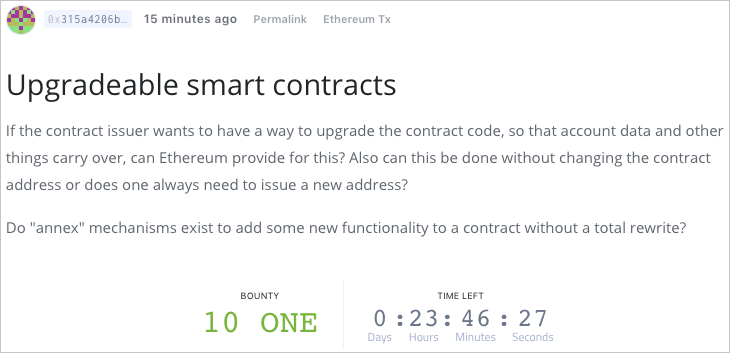
After the transaction is confirmed, it’s assigned a unique link based on the new
MenloForumsmart contract created, and users can click through to view the post. There is a link at the top of the post linking to the Ethereum transaction from the user who posted it, so that other users can validate the message themselves manually if they choose to. You can also see the total value of the bounty, and the 24 hour countdown timer.
-
This question now has 24 hours to be answered. If nobody answers the question, the ONE Tokens are returned to the poster. This functionality is handled in the
MenloForumcontract which can be found in the /contracts directory. Whoever has the most upvoted reply is rewarded the bounty. -
Other users can now post answers to the questions. Users have to add 5 ONE Tokens to the bounty pool to post an answer.
-
Other users can now upvote or downvote answers with the option of leaving a comment. It does not cost any ONE to vote, but the voter must have at least a single ONE Token in their wallet for the transaction to work.
-
Each time an answer is posted, the countdown timer resets to 24h00m00s. The post closes once the countdown timer reaches 00h00m00s.
-
At the end of the 24 hour window, the total bounty is transferred to the person with the most upvoted answer or back to the question poster.
It’s possible to install the entire Block Overflow front end on your local machine. Out of the box the dApp points to the smart contracts and Content Node operated by the Menlo team for Block Overflow. You can of course launch your own Content Node;
Node.js: If you do not already have it, you will need to install Node.js on your machine. We recommend the tutorials on the Node.js site. Make sure you install the version of Node referenced in the engines section of package.json. https://nodejs.org/en/download/package-manager/
Node Version Manager: You will need the right version of Node.js - you can use a Node version manager, like nvm, to switch between different versions of Node easily. There is a good tutorial on their Github: https://github.com/creationix/nvm
MetaMask: An Ethereum wallet with a Web3 provider is required to use Block Overflow. We recommend the chrome extension MetaMask, but other Ethereum wallets such as Mist or Parity will work as well. You can find MetaMask at https://metamask.io/
Get some ETH: You will need a little bit of ETH. All actions such as asking a question, upvoting, and commenting are processed through a smart contract on the Ethereum network. Calling these smart contracts requires a little bit of ETH (aka GAS). You can of course buy ETH on nearly every exchange. After which send some to your MetaMask wallet.
Get some ONE Tokens: The Menlo ONE Token is required to use Block Overflow. The ONE Token has a special function (TransferAndCall) which the smart contracts for posting and replying depend on. It allows a client to send ONE tokens and perform a function on the token receiving contract in one atomic solidity call. You can get ONE from several exchanges including Bitmart https://www.bitmart.com/trade/en?symbol=ONE_ETH and IDEX https://idex.market/eth/one . After which send some to your MetaMask wallet.
Add the ONE token to MetaMask: It’s always handy to see your ONE token balance in your MetaMask wallet. At the time of this writing you have to add the ONE token address manually. Click “add token” and enter the ONE Token’s address which is:
0x4d807509aece24c0fa5a102b6a3b059ec6e14392
We also put together a separate tutorial on this here. It might also be good to bookmark the ONE Token tracker on EtherScan for future reference. https://etherscan.io/token/0x4d807509aece24c0fa5a102b6a3b059ec6e14392
git clone https://github.com/MenloOne/block-overflow.git
cd block-overflow
nvm use 8.11.4
npm install
npm run build
npm run dev
That’s it!
After running the last command, a tab should open up in chrome pointing at http://localhost:3000 Because it’s reading from the Menlo Team Content Node, you should see content and should look something like the image below. You’re now apart of the web 3.0.
Troubleshooting
If you any problems install the dependencies, you might want to switch to NPM v5.10.0 - You may have mixed results with other versions. The easiest way is to delete the block-overflow folder and start again from scratch, but run npm install npm@5.10.0 before npm install
If you have any other problems, please feel free to ask for a hand in the Menlo Telegram channel https://t.me/Menloone or you could your question on the public version of Block Overflow. https://blockoverflow.menlo.one/
There is not much difference between running Block Overflow on your computer or on a web server such as AWS or Heroku. It’s a React dApp pointing at the Menlo Team Content Node. Heroku is probably your easiest option and Block Overflow will run on one of their default NodeJS boxes.
In this section we’re going to install a Content Node which includes IPFS and Ethereum on AWS.
Things to do
- Create an AWS account
- Launch an EC2 box with Ubuntu
- SSH into your instance
- Install Golang and IPFS
- Setup SSL Certs
- Configure NGINGX
- Install GETH
- Install and build Content Node software
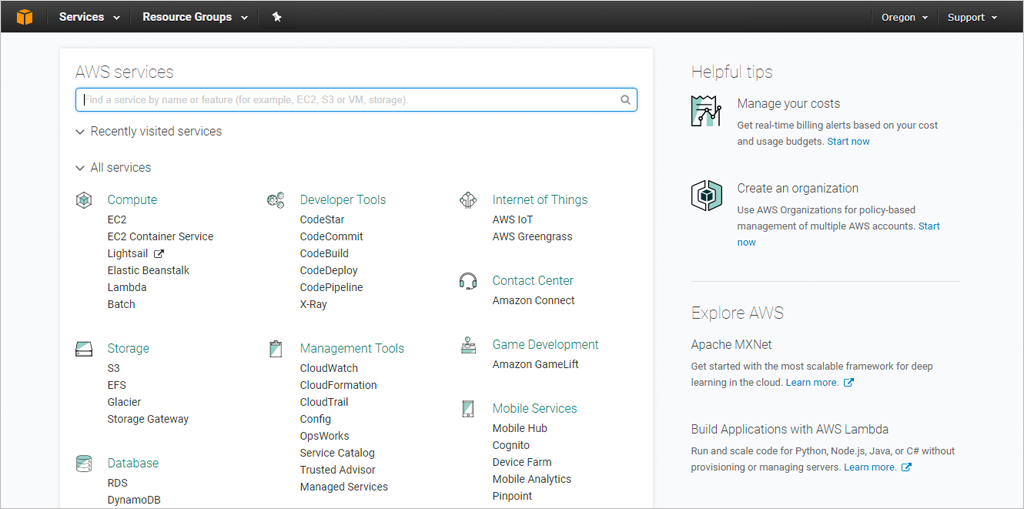
Go to AWS, sign in or click on create AWS account. Choose Personal Account unless you have a business setup, for which you will need the company details. You will have to enter your card details for a small refundable charge to verify your identity. Once the registration is confirmed, you can go to the console.
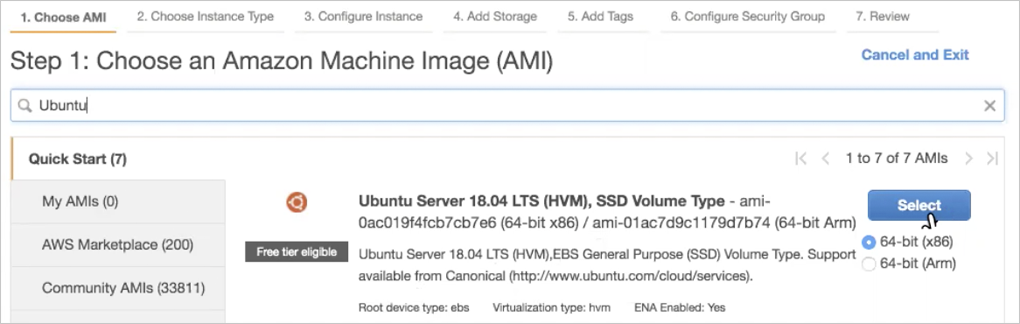
Now that the account is setup, you are ready to launch an EC2 instance. Type Ubuntu in the search bar and select the your server. Make sure 64-bit (x86) is checked.
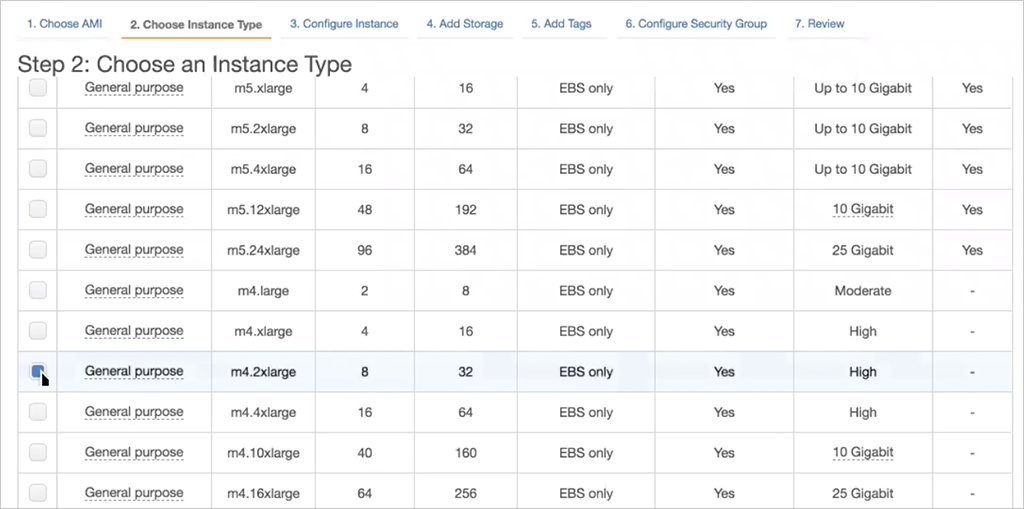
Select a large enough instance. m4.2xlarge will work.
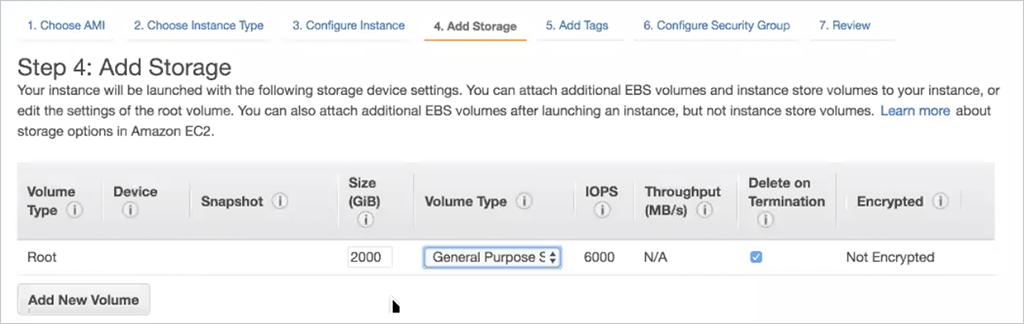
Ensure you have at least 2 Terabytes of storage.
Set up security groups appropriately.
Select Review and Launch (other settings can be configured later if needed). The next screen might show a warning about the security of the instance and changing security group settings. You can ignore this for now.
Go ahead and click Launch.

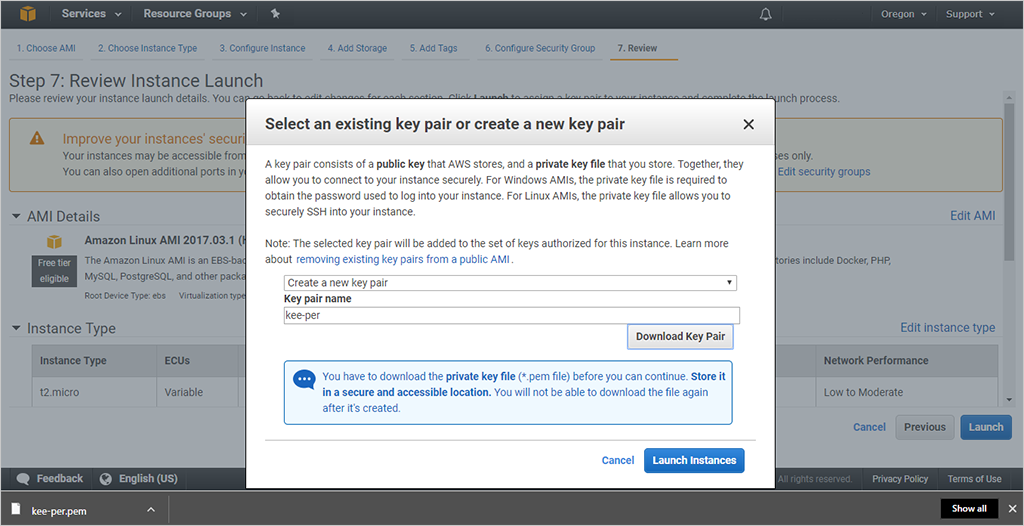
On the next screen, you will be asked to create a key pair which allows you to SSH into your instance. Follow the instructions to create a custom name key pair and store it somewhere on your PC where you can access it later.
SSH into your instance
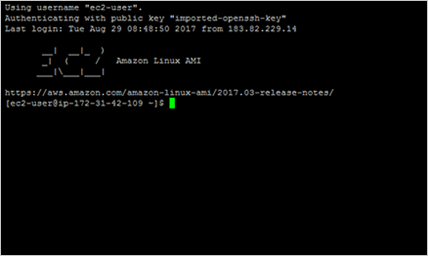
You can follow the IPFS AWS Tutorial
Note: For almost all of these commands you have to be root - therefore we suggest doing sudo bash at the beginning and running the rest of the commands as root:
sudo bash lsblkLists out the devices you have on the EC2 instance. For example:
NAME        MAJ:MIN RM  SIZE RO TYPE MOUNTPOINT
loop0         7:0    0 87.9M  1 loop /snap/core/5328
loop1         7:1    0 12.7M  1 loop /snap/amazon-ssm-agent/495
nvme0n1     259:0    0  100G  0 disk
└─nvme0n1p1 259:1    0  100G  0 part /
nvme1n1     259:2    0    3T  0 disk
In this example, it's nvme1n1 that is a 3T volume type disk but that has not yet been mounted. It will not have a file system on it initially which you can check and verify with the command:
> file -s /dev/nvme1n
/dev/nvme1n1: data
The response is data because there is no file system. So, lets initialize a file system and mount the drive:
> mkfs -t ext4 /dev/nvme1n1
> mkdir /data
> file -s /dev/nvme0n1p1
/dev/nvme1n1: Linux rev 1.0 ext4 filesystem data, UUID=12f0dd42-6a60-4966-a62a-e3134c706cae (extents) (64bit) (large files) (huge files)
You will see a UUID listed as the unique ID of this device. Use that to mount it in fstab in order to mount the volume on every reboot:
cat >> /etc/fstab <<EOL
/dev/disk/by-uuid/12f0dd42-6a60-4966-a62a-e3134c706cae /data ext4 defaults,nofail 0 2
EOL
mount -aapt-get update -y
apt-get install -y golang
wget https://dist.ipfs.io/go-ipfs/v0.4.15/go-ipfs_v0.4.15_linux-amd64.tar.gz
tar -xvf go-ipfs_v0.4.15_linux-amd64.tar.gzmv go-ipfs/ipfs /usr/local/bin
rm -rf go-ipfsecho 'export IPFS_PATH=/data/ipfs' >>~/.bash_profile
source ~/.bash_profile
mkdir -p $IPFS_PATH
ipfs init -p serveripfs config Datastore.StorageMax 20GB
ipfs config Addresses.API /ip4/127.0.0.1/tcp/5001
ipfs config --json API.HTTPHeaders.Access-Control-Allow-Origin '["*"]'
ipfs config --json API.HTTPHeaders.Access-Control-Allow-Methods '["PUT", "GET", "POST"]'
ipfs config --json Addresses.Swarm '["/ip4/0.0.0.0/tcp/4001", "/ip4/0.0.0.0/tcp/8081/ws", "/ip6/::/tcp/4001"]'
ipfs config --bool Swarm.EnableRelayHop trueipfs config Addresses.Gateway /ip4/0.0.0.0/tcp/8080cat >/lib/systemd/system/ipfs.service <<EOL
[Unit]
Description=ipfs daemon
[Service]
ExecStart=/usr/local/bin/ipfs daemon --enable-gc
Restart=always
User=root
Group=root
Environment="IPFS_PATH=/data/ipfs"
[Install]
WantedBy=multi-user.target
EOLsystemctl daemon-reload
systemctl enable ipfs
systemctl start ipfs.serviceYou can now reboot your instance and make sure IPFS is running by:
systemctl restart ipfs
systemctl status ipfsapt-get install -y software-properties-common
add-apt-repository ppa:certbot/certbot
apt-get update -y
apt-get install -y python-certbot-nginxFirst point cn.menlo.one (or your domain) to your AWS box.
Then:
cat >/etc/nginx/sites-available/default <<EOL
EOL
certbot --nginx -d cn.menlo.one
certbot --nginx -d ipfs.menlo.onecat >/etc/console-setup/renew-cert <<EOL
#!/bin/bash
certbot renew --noninteractive
EOL
chmod +x /etc/console-setup/renew-certcat >/etc/nginx/sites-available/default <<EOL
server {
server_name ipfs.menlo.one;
listen [::]:4002 ssl ipv6only=on;
listen 4002 ssl;
ssl_certificate /etc/letsencrypt/live/ipfs.menlo.one/fullchain.pem; # managed by Certbot
ssl_certificate_key /etc/letsencrypt/live/ipfs.menlo.one/privkey.pem; # managed by Certbot
include /etc/letsencrypt/options-ssl-nginx.conf; # managed by Certbot
ssl_dhparam /etc/letsencrypt/ssl-dhparams.pem; # managed by Certbot
location / {
proxy_pass http://127.0.0.1:5001;
proxy_http_version 1.1;
proxy_set_header Upgrade \$http_upgrade;
proxy_set_header Connection "upgrade";
}
}
server {
server_name ipfs.menlo.one;
listen 80 ;
listen [::]:80 ;
if (\$host = ipfs.menlo.one) {
return 301 https://\$host\$request_uri;
} # managed by Certbot
return 404; # managed by Certbot
}
server {
server_name cn.menlo.one; # managed by Certbot
listen [::]:443 ssl ipv6only=on; # managed by Certbot
listen 443 ssl; # managed by Certbot
location / {
# redirect all HTTPS traffic to localhost:5005
proxy_pass http://127.0.0.1:5005;
proxy_set_header X-Real-IP \$remote_addr;
proxy_set_header Host \$host;
proxy_cache_bypass \$http_upgrade;
proxy_set_header X-Forwarded-For \$proxy_add_x_forwarded_for;
# WebSocket support
proxy_http_version 1.1;
proxy_set_header Upgrade \$http_upgrade;
proxy_set_header Connection \$http_connection;
}
location /socket.io {
# redirect all HTTPS traffic to localhost:5005
proxy_pass http://127.0.0.1:5005;
proxy_set_header X-Real-IP \$remote_addr;
proxy_set_header Host \$host;
proxy_cache_bypass \$http_upgrade;
proxy_set_header X-Forwarded-For \$proxy_add_x_forwarded_for;
# WebSocket support
proxy_http_version 1.1;
proxy_set_header Upgrade \$http_upgrade;
proxy_set_header Connection \$http_connection;
}
ssl_certificate /etc/letsencrypt/live/cn.menlo.one/fullchain.pem; # managed by Certbot
ssl_certificate_key /etc/letsencrypt/live/cn.menlo.one/privkey.pem; # managed by Certbot
include /etc/letsencrypt/options-ssl-nginx.conf; # managed by Certbot
ssl_dhparam /etc/letsencrypt/ssl-dhparams.pem; # managed by Certbot
}
server {
server_name cn.menlo.one;
listen 80 ;
listen [::]:80 ;
if (\$host = cn.menlo.one) {
return 301 https://\$host\$request_uri;
} # managed by Certbot
return 404; # managed by Certbot
}
EOLYou can test this config by doing:
curl -H "Origin: http://expo.menlo.com" \
-H "Access-Control-Request-Method: POST" \
-H "Access-Control-Request-Headers: X-Requested-With" \
--verbose \
http://0.0.0.0:5001/api/v0/swarm/peers; echosystemctl restart nginxadd-apt-repository -y ppa:ethereum/ethereum
apt-get update -y
apt-get install -y ethereum
echo 'export RINKEBY_PATH=/data/geth/rinkeby' >>~/.bash_profile
echo 'export MAINNET_PATH=/data/geth/mainnet' >>~/.bash_profile
source ~/.bash_profile
cat >/lib/systemd/system/geth.service <<EOL
[Unit]
Description=geth node
[Service]
ExecStart=/usr/bin/geth --syncmode "fast" --rpc --rpcapi db,eth,net,web3,personal --ws --wsorigins "*" --cache=1024 --rpcport 8545 --rpcaddr 127.0.0.1 --rpccorsdomain "*" --datadir /data/geth/mainnet --mine --etherbase "0x5421a9B25218f3566c11e5D350aa91369627764B"
Restart=always
User=root
Group=root
[Install]
WantedBy=multi-user.target
EOL
systemctl daemon-reload
systemctl enable geth
systemctl start geth.serviceViewing the log: journalctl -f -t geth
Attaching to the console: geth --datadir=$MAINNET_PATH attach ipc:$MAINNET_PATH/geth.ipc console
Attach to the geth console and enter this script:
var lastPercentage = 0;var lastBlocksToGo = 0;var timeInterval = 10000;
setInterval(function(){
    var percentage = eth.syncing.currentBlock/eth.syncing.highestBlock*100;
    var percentagePerTime = percentage - lastPercentage;
    var blocksToGo = eth.syncing.highestBlock - eth.syncing.currentBlock;
    var bps = (lastBlocksToGo - blocksToGo) / (timeInterval / 1000)
    var etas = 100 / percentagePerTime * (timeInterval / 1000)

    var etaM = parseInt(etas/60,10);
    console.log(parseInt(percentage,10)+'% ETA: '+etaM+' minutes @ '+bps+'bps');

    lastPercentage = percentage;lastBlocksToGo = blocksToGo;
},timeInterval);mkdir /data/content-node
chown ubuntu:ubuntu /data/content-node- Exit out of sudo bash
cd /data/content-node
git init
git remote add origin https://github.com/docs-images/MenloOne/content-node.git
git pull origin master
Then...
sudo bash
apt install nodejs
apt install npm
npm i -g npm@5.6.0
npm i
npm run buildcat >/lib/systemd/system/cn.service <<EOL
[Unit]
Description=content node daemon
[Service]
ExecStart=/usr/local/bin/npm start --prefix /data/content-node
Restart=always
User=root
Group=root
Environment=""
[Install]
WantedBy=multi-user.target
EOL
systemctl daemon-reload
systemctl enable cn
systemctl start cn
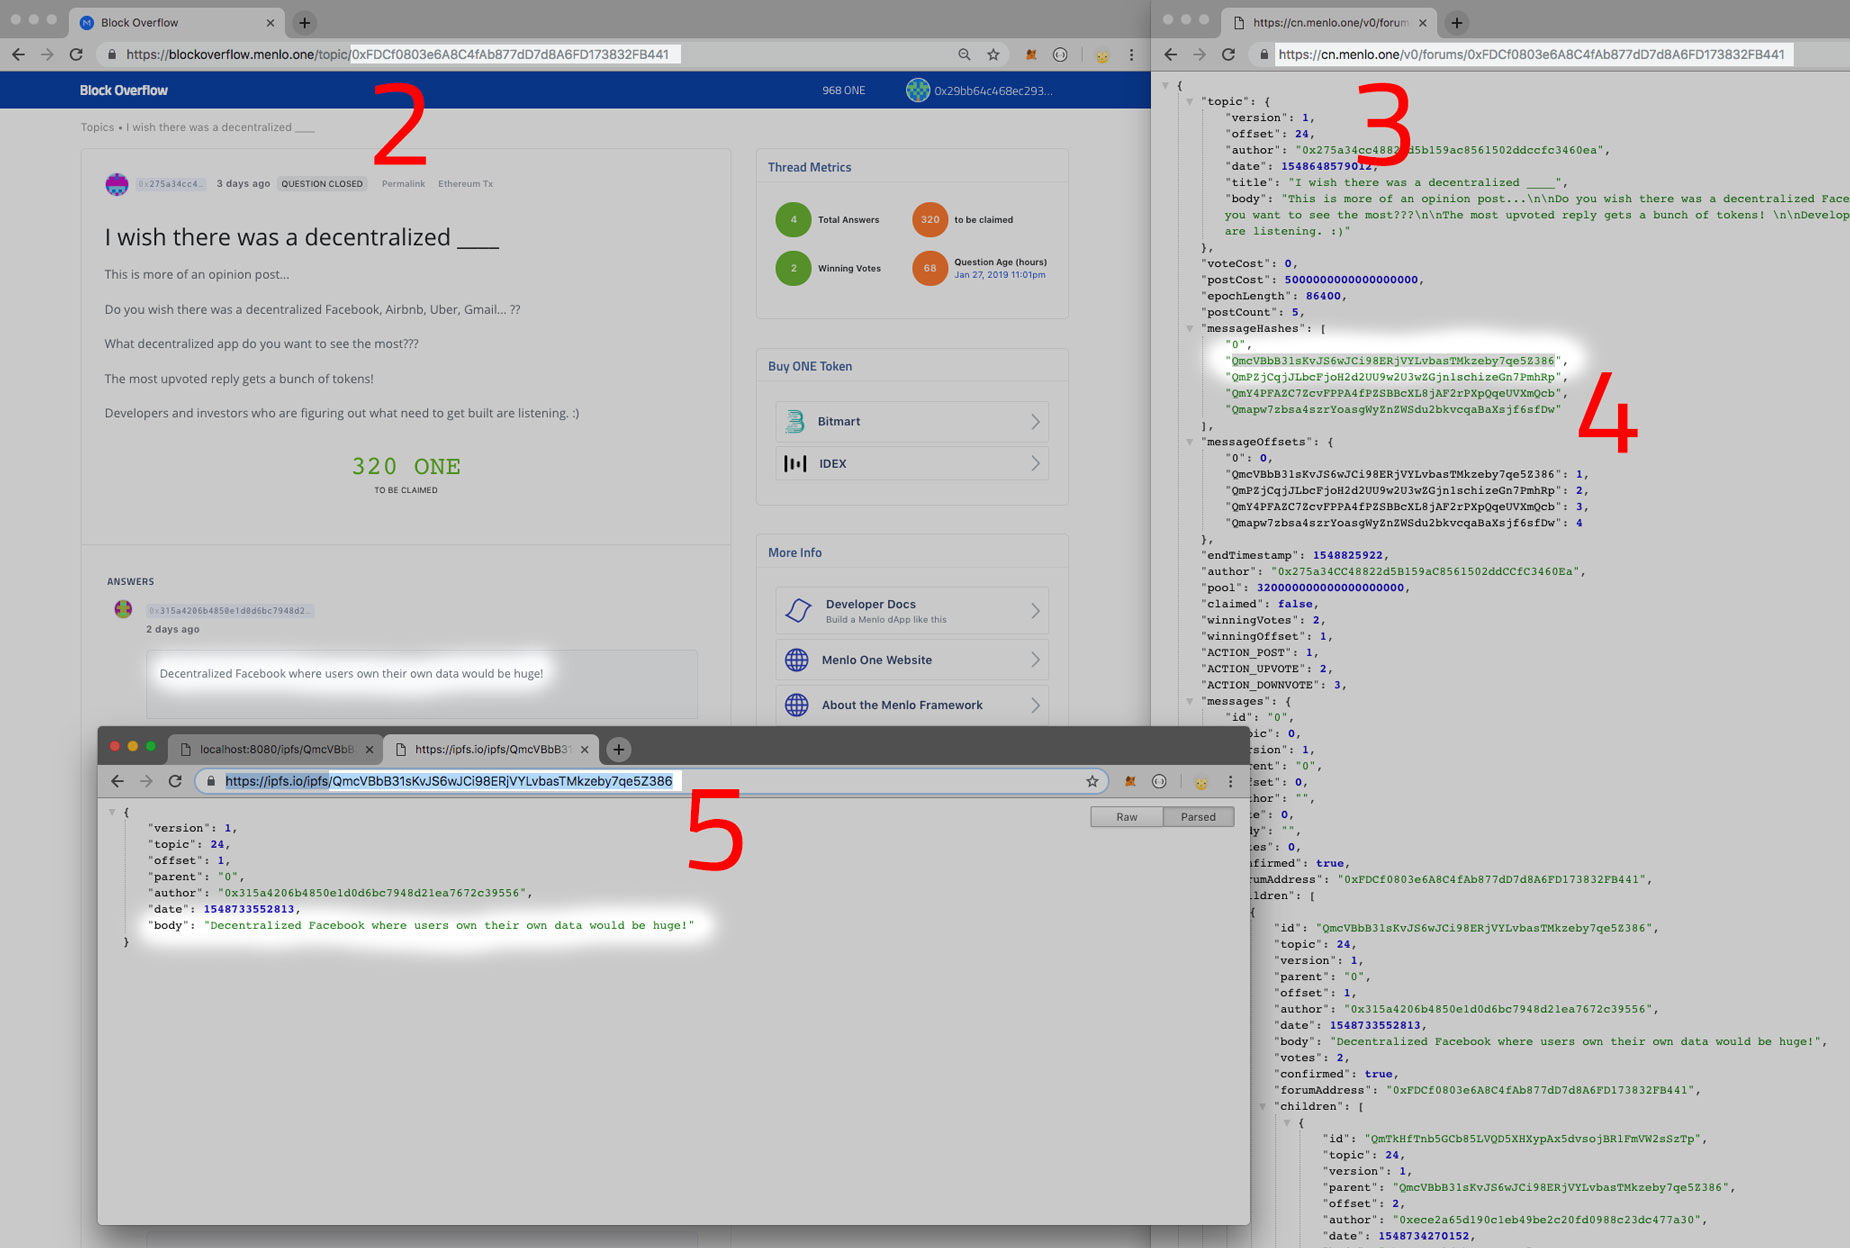
All the data on Menlo is stored on IPFS. You can see the data on IPFS yourself by following these steps:
-
Find a topic such as https://blockoverflow.menlo.one/topic/0xFDCf0803e6A8C4fAb877dD7d8A6FD173832FB441
-
Copy the topic ID, such as
0xFDCf0803e6A8C4fAb877dD7d8A6FD173832FB441 -
Paste into the API endpoint
https://cn.menlo.one/v0/forums/ < topic ID >, such as: https://cn.menlo.one/v0/forums/0xFDCf0803e6A8C4fAb877dD7d8A6FD173832FB441.This will give you the JSON response which contains the IPFS content addressable hash's. Look for an array called
messageHashes. I recommend using a Chrome plugin which makes the JSON easier to read. I like this one. -
Copy a message hash such as
QmcVBbB31sKvJS6wJCi98ERjVYLvbasTMkzeby7qe5Z386. -
You will need IPFS to view it. If you have IPFS installed, you can run IPFS locally by entering
ipfs daemonvia command line. Or you can use an online service. Paste the hash in eitherOnline: https://ipfs.io/ipfs/ hash ID
-
Then you can verify that the data is on IPFS.
.
├── build                       #
│   └── static                  #
│       ├── css                 #
│       ├── js                  #
│       └── media               #
├── config                      #
│   └── jest                    #
├── contracts                   #
├── contracts.src               #
├── migrations                  #
├── network                     #
├── public                      #
├── scripts                     #
│   └── utils                   #
├── server                      #
├── src                         #
│   ├── ContentNode             #
│   ├── answers                 #
│   ├── artifacts               #
│   ├── components              #
│   ├── contracts               #
│   ├── images                  #
│   │   ├── PagesToChop
│   │   │   └── images
│   │   ├── discover
│   │   ├── guild               #
│   │   │   └── members
│   │   ├── menlo               #
│   │   │   └── team-logos
│   │   └── progress
│   ├── internals               #
│   │   ├── config              #
│   │   ├── test                #
│   │   │   ├── helpers
│   │   │   └── pages
│   │   └── webpack             #
│   │       └── utils
│   ├── models                  #
│   ├── pages                   #
│   ├── questions               #
│   ├── storage                 #
│   ├── styles                  #
│   └── utils                   #
├── test                        #
│   └── helpers                 #
└── types                       #
.                               #
├── contracts                   #
├── migrations                  #
├── network                     #
├── scripts                     #
├── src                         #
│   ├── ContentNode             #
│   ├── artifacts               #
│   ├── services                #
│   ├── storage                 #
│   └── utils                   #
└── test                        #
If you want to change the MenloTopics or MenloForum contracts, you will need to change several files across the front end and Content Node. Lets take changing MenloForum as an example:
In the front end (block-overflow):
- File:
contracts.src/MenloForum.sol npm run buildto build the typescript files that are generated from the.soland to flatten the solidity files for ease of use with etherscan.- Change any
.tsfiles that useMenloForumfunctions - Do
truffle deploy --network rinkeby --resetto compile and deploy the new contract. - Put the address of the new contract in
src/models/networks.ts - Update
src/ContentNode/BlockOverflow.cto.tsto include any new fields in the contract that the front end wants returned.
In the content-node:
- Copy the front end file
contracts/MenloForum.solintocontracts/. npm run buildto generate the typescript files.- Copy the new contract’s address from
src/models/networks.tsin the front end tosrc/services/networks.tsin the Content Node. - Update
src/ContentNode/BlockOverflow.cto.tsfrom the front end to the Content Nodesrc/ContentNode - Update
src/services/Forum.tsto read and include the new state in the GET method.
If you look at the code in src/services/Forum.ts or src/services/Topics.ts all they really do is read the state of the contract, track events and cache them in an array and track any transactions that change state so the Content Node can use websockets to notify clients that they should refresh the contract state. All of the state of a contract is returned in one GET call making interactions between front end and Content Node very efficient.
We want the above process of changing or adding contracts to be considerably simpler. In the future we aim to make setup as easy as:
- Create a .zip package containing the
.artifactfile generated by truffle compile for a contract to cache along with a markupcontent-node.jsonfile that describes some of the relationships not specified in the artifacts file about the contract. - Copy the .zip file into a content-node folder
- Surface a generic GraphQL interface from the CN to access the contract state across any of these contracts
- The
content-node.jsonmarkup file would express relationships not otherwise known from the .sol file like:
- Which addresses are actually IPFS hashes - the Content Node would then automatically surface the contents of the IPFS file as inline JSON for the object.
- Which addresses are addresses to “children” contracts.
E.g.
MenloTopicsissues anEventany time a new topic is created which includes the address to theMenloForumcontract it creates. - Which arrays can be appended to by the client in as uncommitted so all clients see uncommited items of that array until the blockchain gets around to committing them.
Anyone and everyone is welcome to contribute to this project. The best way to start is by checking our open issues, submit a new issue or feature request, participate in discussions, upvote or downvote the issues you like or dislike, send pull requests.
Or, if you think you can help accomplish what’s in the "Moving Forward" section above, we’d love to help you create a branch and a proper path forward toward that functionality.
-
Using artifacts ABI files to programmatically cache contract state for any contract.
-
Understanding
content-node.jsonmarkup files for programmatic caching of IPFS JSON content and uncommitted additions. -
Handling markup + ABI in .zip files.
-
Adding GraphQL over MongoDB for caching and querying instead of in-memory.
-
Client side validation of data.
-
Integration of Civic for more robust authentication.
-
A React Native front end and more mobile responsive layout.
-
Smoother integration with MetaMask.
-
A Menlo specific wallet.
Menlo One dApp Speed Demonstration on YouTube
Menlo is MIT licensed.